
Why Your First Microgreens Tray Makes or Breaks Your Harvest
The right beginner microgreens growing tray is the single most important piece of equipment you’ll buy when starting out. The good news? You only need a few basics to get your first harvest in as little as 7-14 days.
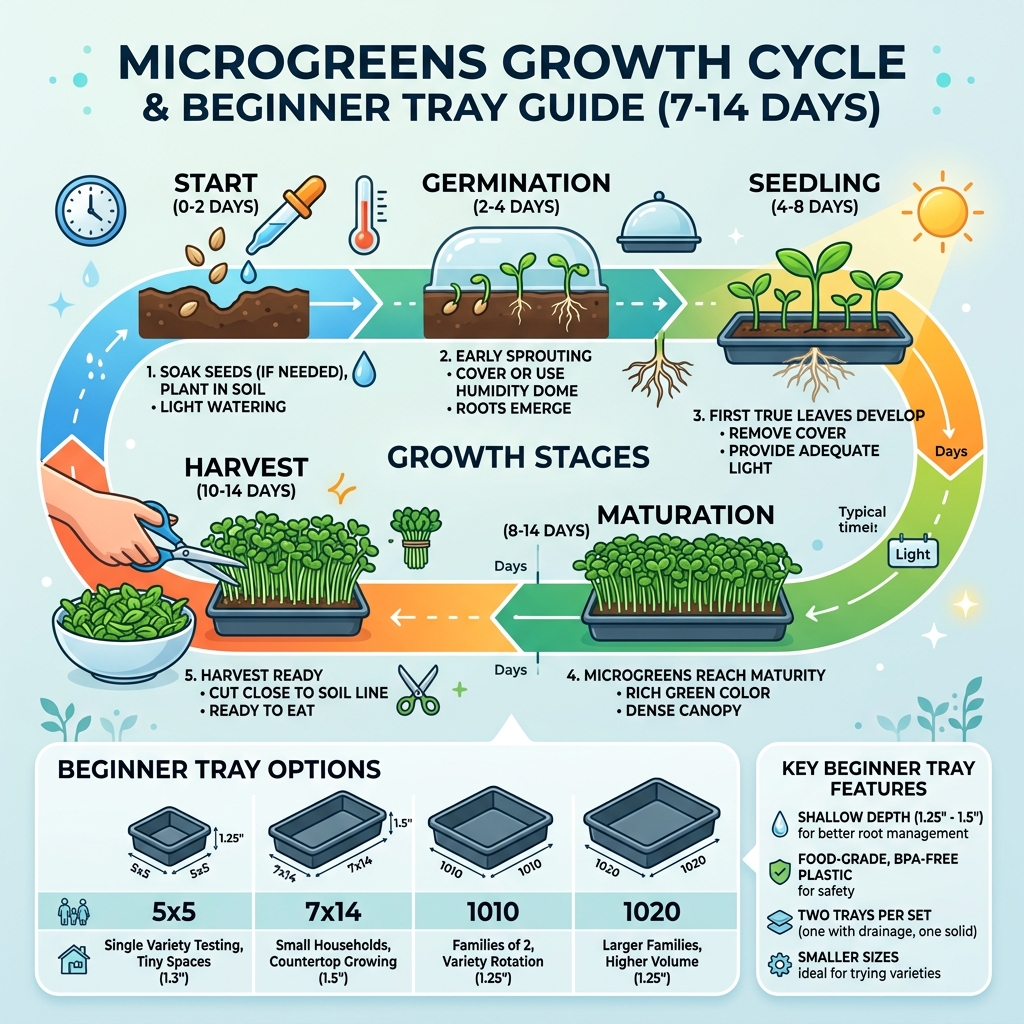
Here are the best tray options for beginner microgreen growers:
| Tray Size | Best For | Depth |
|---|---|---|
| 5×5 | Single variety testing, tiny spaces | 1.3 inches |
| 7×14 | Small households, countertop growing | 1.5 inches |
| 1010 | Families of 2, variety rotation | 1.25 inches |
| 1020 | Larger families, higher volume | 1.25 inches |
A few things matter most when picking your tray:
- Shallow depth (1.25-1.5 inches) works for almost every microgreen variety
- Food-grade, BPA-free plastic keeps your food safe
- Two trays per set — one with drainage holes, one solid bottom for watering
- Smaller trays are better for beginners to test varieties before committing
Microgreens have very shallow roots, so you don’t need deep soil or complex equipment. Most varieties — like radish, broccoli, and cabbage — germinate in just 24-48 hours at room temperature (65-75°F) and are ready to harvest within 7-10 days.
The tricky part isn’t growing them — it’s choosing the right tray setup from the start so you avoid common problems like mold, uneven watering, and wasted seeds.
Below, we break down the best beginner tray options and exactly how to use them.
Choosing Your First beginner microgreens growing tray
When we first start growing, it is tempting to grab any old Tupperware or a flimsy nursery flat from the local big-box store. However, we’ve found that investing in a dedicated beginner microgreens growing tray saves money and frustration in the long run. Professional-grade trays are built to withstand the weight of soil and water without buckling, which is essential when you are moving trays around your kitchen or grow rack.

Why Depth Matters in a beginner microgreens growing tray
One of the most common mistakes beginners make is using a tray that is too deep. Most microgreens only need about 1 to 2 inches of growing medium because their roots are incredibly shallow.
A tray with a shallow depth—specifically between 1.25 and 1.5 inches—is the industry “sweet spot.” Using a shallow beginner microgreens growing tray offers several advantages:
- Airflow: Lower tray walls allow air to circulate around the base of the stems, which is the best defense against mold.
- Harvesting Ease: When the tray walls are low, you can easily slide your scissors or a knife across the top of the soil to harvest the greens. Deep trays force you to reach down into the “well,” often resulting in uneven cuts or bruised stems.
- Resource Conservation: You’ll use significantly less soil or coconut coir, saving you money on every single crop.
Selecting the Right Material for a beginner microgreens growing tray
We always recommend food-grade plastics, specifically #5 polypropylene (PP). This material is BPA-free, heat-resistant, and incredibly durable. Unlike the thin, “one-time use” trays that crack after a single season, heavy-duty PP trays can last years—some growers report using the same set for over three years without issue.
For those who want to avoid soil mess, there are also silicone grow mediums and mesh inserts. These allow for a “soil-free” experience, often using a reservoir tray underneath to provide water. If you’re curious about how different materials stack up, check out our detailed tray reviews to find the perfect fit for your home setup.
Understanding Tray Sizes: From 1020 to 5×5
In microgreens, tray sizes are named after their dimensions in inches. Understanding these standards helps you calculate how much seed and soil you need.
| Tray Type | Dimensions (Approx) | Use Case |
|---|---|---|
| 1020 | 10″ x 20″ | The industry standard; best for high-volume crops like pea shoots. |
| 1010 | 10″ x 10″ | Half the size of a 1020; perfect for a family of two. |
| 7×14 | 7″ x 14″ | Compact “countertop” size; often comes in kits with domes. |
| 5×5 | 5″ x 5″ | 1/8th the size of a 1020; ideal for testing new varieties. |
Benefits of Starting with Smaller Trays
For a beginner, the 1020 tray can be intimidating. It requires a lot of seed and produces a massive amount of greens all at once. If you can’t eat them all in a few days, they may go to waste in the fridge.
This is why we love the 5×5 and 7×14 sizes for newcomers. They offer manageable harvests that a single person or small family can actually finish. Using smaller trays also allows for “variety rotation.” You can grow four different types of microgreens (like radish, broccoli, kale, and kohlrabi) in the space of one large tray. Many kits even offer color-coded trays, making it easy to track which crop was planted when. If you’re just starting your journey, our microgreens 101 guide covers the basics of variety selection.
How Many Trays Does a Beginner Need?
To keep a consistent supply of fresh greens, you’ll need more than one tray. We suggest starting with at least two or three sets. A “set” consists of one tray with holes and one without.
In a typical rotation:
- Set 1 is in the “Blackout” or germination phase (stacked and weighted).
- Set 2 is under the lights, growing toward harvest.
- Set 3 is being cleaned or prepped for the next round.
If you find your family eating microgreens with every meal, you can easily scale up by adding more 1010 or 1020 trays to your collection.
The Mechanics of Growth: Drainage and Bottom Watering
Proper hydration is the difference between a lush tray and a moldy mess. This is where the design of your beginner microgreens growing tray becomes critical.
Using Trays with and Without Holes
The most successful method for home growers is the “nesting” technique. You place a tray with drainage holes inside a solid bottom tray (the reservoir).
- The Top Tray (with holes): Holds the growing medium and the seeds. The holes allow roots to reach down for water and allow excess moisture to escape.
- The Bottom Tray (no holes): Acts as a water reservoir. Instead of pouring water over the delicate leaves (which causes mold), you pour water into the bottom tray. The soil in the top tray then “wicks” the moisture up from the bottom.
This bottom-watering method ensures moisture consistency and keeps the foliage dry, which is the best way to prevent root rot and damping-off disease. Some advanced systems use wick systems or hydroponic mats, but for beginners, the simple two-tray nesting system is nearly foolproof.
Step-by-Step: Using Your Trays for Success
Once you have your trays, the process is straightforward. First, fill your tray with holes with about 1 to 1.5 inches of moistened organic seed starting mix. Use a small hand rake or even a piece of cardboard to level the soil. This is vital; an uneven surface leads to water pooling and uneven growth. For more on the physical layout, see our garden setup guide.
The Stacking and Blackout Phase
After sowing your seeds—roughly 1 to 1.5 ounces of small seeds for a 1020 tray, or about a teaspoon for a 5×5—mist them with a spray bottle. Then, place another tray (without holes) directly on top of the seeds.
Wait, you’re putting a tray on the seeds? Yes! Adding a weight (like a brick or a heavy stone) on top of the stacking tray forces the seeds to make contact with the soil and encourages the roots to grow deep. This “blackout” period usually lasts 3 to 5 days. It makes the stems stronger and ensures they all germinate at the same time.
Transitioning to Light and Watering
Once your microgreens are about an inch tall and pushing the top tray up, it’s time for “the reveal.” Remove the top tray and introduce them to light. While a sunny windowsill can work, we recommend three wand lights or LED shop lights for consistent results.
Microgreens need at least 6-8 hours of light daily, though many pros provide up to 15 hours. At this stage, stop misting the tops and begin bottom watering exclusively. Use room-temperature water in a small watering can to fill the bottom tray. Check out our ultimate guide to growing at home for more lighting and temperature tips.
Cleaning and Maintenance to Prevent Mold
A clean beginner microgreens growing tray is a productive one. Mold is the #1 enemy of the microgreen grower, and it often hides in the nooks and crannies of dirty trays.
After you harvest your greens, follow these steps:
- Remove Old Media: Dump the spent soil and root mat into your compost bin.
- Wash: Use hot soapy water to scrub away any remaining debris. Most heavy-duty trays are dishwasher safe (top rack, no heat dry).
- Sterilize: Spray the trays with a 3% hydrogen peroxide solution or a very mild bleach solution to kill any lingering spores.
- Air Dry: Let the trays dry completely in the sun or a well-ventilated area before your next planting.
Expert Tip: Don’t confuse root hairs with mold! Root hairs are tiny, white, fuzzy structures that grow directly out of the root. Mold looks like a spiderweb and usually has a musty smell.
Frequently Asked Questions about Microgreen Trays
Should I use shallow or deep trays for pea shoots?
For tall-growing crops like Pea Shoots, sunflowers, and wheatgrass, we recommend deep 2.5-inch trays. These crops have more aggressive root systems and need the extra support and space to prevent the tray from toppling over as they grow 6-8 inches tall.
Can I reuse my growing trays indefinitely?
If you buy high-quality, heavy-duty plastic trays, they are designed for years of use. Many come with a 2-year warranty. However, keep an eye out for cracks or UV damage (if left in the sun). Once the plastic becomes brittle, it’s time to recycle it and get a fresh set.
Do I need a humidity dome for every tray?
Not necessarily. Humidity domes are helpful during the first 24-48 hours of germination if your house is very dry. However, once the seeds have sprouted, the dome should be removed to allow for airflow. Overusing a dome is a fast track to mold issues.
Conclusion
At FinanceOrbitX, we believe that growing your own food is one of the smartest investments you can make. By choosing the right beginner microgreens growing tray, you are setting yourself up for a lifetime of high-yield, low-cost nutrition. While it might be tempting to save a few dollars on flimsy disposables, quality trays pay for themselves within the first few harvests through soil savings and crop reliability.
Ready to stock up? Visit our supplies category to find everything you need to start your indoor garden today. Happy growing!
