
Why Every Apartment Dweller Should Know These Indoor Composting Tips
Indoor composting tips every beginner should know, fast:
- Choose a method: Vermicomposting (worms), Bokashi (fermentation), or aerobic (microbes)
- Pick your bin: A small, lidded container works for most apartments
- Balance your inputs: 2 parts browns (cardboard, paper) to 1 part greens (food scraps)
- Control moisture: Bedding should feel like a wrung-out sponge
- Avoid problem foods: No meat, dairy, or oily items in most indoor systems
- Harvest in 3-6 months: Dark, earthy compost ready to feed your plants
Think composting is only for people with big backyards? It’s not.
You can turn kitchen scraps into rich, plant-feeding compost right inside your apartment — no garden required. And if you’re growing microgreens or herbs at home, that finished compost is basically free fertilizer.
Here’s the honest reality: most food scraps end up in landfills, where they break down without oxygen and release methane — a greenhouse gas far more potent than CO2. Composting at home short-circuits that process entirely.
The best part? It doesn’t have to smell. It doesn’t have to take up space. And it doesn’t have to be complicated.
This guide walks you through everything — from picking the right method to harvesting your first batch of “black gold” for your plants.
Why Urban Dwellers Need Indoor Composting
For those of us living in “itty-bitty living quarters,” the idea of a rotting pile of food in the kitchen sounds like a nightmare. However, we’ve found that indoor composting is one of the most high-yield “investments” you can make for your home environment.
When organic waste sits in a landfill, it undergoes anaerobic decomposition, which produces methane. By using indoor composting tips to manage waste at the source, you are participating in active landfill diversion. This isn’t just about trash; it’s about carbon sequestration. Compost builds soil that absorbs CO2 and conserves water, making your indoor garden more resilient.
According to the Composting At Home | US EPA, composting is nature’s way of recycling. For the urban dweller, it’s a way to turn a “liability” (trash) into an “asset” (nutrient-rich soil). Beyond the environmental impact, there’s a practical health benefit: some studies suggest that active indoor composting and gardening can reduce household dust levels by up to 60% and airborne allergens by as much as 80%.
Choosing Your Method: Top Indoor Composting Tips for Success
Before you buy a bin, you need to decide which “micro-farm” fits your lifestyle. Not all composting is created equal. Some methods rely on oxygen (aerobic), some on fermentation (Bokashi), and some on the hard work of thousands of tiny “employees” (worms).
| Method | Process | Timeline | Best For |
|---|---|---|---|
| Aerobic | Microbes & Oxygen | 2-4 Months | Beginners with a balcony or ventilated space |
| Bokashi | Fermentation (Anaerobic) | 2-4 Weeks | People who want to compost meat/dairy |
| Vermicomposting | Worm Digestion | 3-6 Months | High-quality “black gold” for houseplants |
| Electric | Dehydration/Grinding | 3-20 Hours | Maximum convenience and speed |
Aerobic Microbes
This is the most traditional form of composting. It relies on aerobic bacteria to break down matter. The key here is airflow. You’ll need a bin with plenty of holes and you’ll need to “turn” or stir the pile weekly to keep the microbes breathing.
Bokashi Fermentation
Bokashi is a Japanese method that translates to “fermented organic matter.” Unlike other methods, this is anaerobic—meaning it happens without air. You layer scraps with a specialized “bran” inoculated with Effective Microorganisms (EM). It’s fast and can handle meat and dairy, but the result is a “pre-compost” that is very acidic. You’ll need to bury it in a pot of soil for a few weeks before it’s ready for plants.
Electric Composters
If you’re looking for the “autopilot” version of waste management, electric composters are a modern marvel. Some units can break down food by 90 percent in as little as three hours. While they are more of a financial investment (often $300-$700), they offer a scent-free, countertop solution that is perfect for the busiest urbanites.
To learn more about the biological side of things, check out Indoor Composting with a Worm Bin.
Essential Equipment and Materials for Your Bin
To get started, you don’t need a massive budget, but you do need the right essential-tools-for-indoor-gardening. Every successful compost system relies on a balance of “Greens” and “Browns.”
- Greens (Nitrogen-rich): Fruit and veggie scraps, coffee grounds, and fresh green plant clippings. These provide the protein for the microbes or worms.
- Browns (Carbon-rich): Shredded newspaper (no glossy or colored ink!), cardboard, dry leaves, and toilet paper rolls. These provide energy and help manage moisture.
For indoor systems, we recommend a ratio of one pail of green waste to two pails of brown waste. A good rule of thumb is two handfuls of dry scraps for every handful of food scraps. This ensures your bin doesn’t turn into a soggy, smelly mess.
Setting Up Your First Worm Bin: Essential Indoor Composting Tips
Vermicomposting is our favorite method for apartment dwellers because it is compact and produces the highest quality fertilizer. Don’t worry—the worms won’t escape. They like the dark, moist environment of the bin and have no interest in your living room carpet.
Step 1: Get the right worms. Out of 9,000 species of earthworms, only seven are suitable for vermicomposting. You want Red Wigglers (Eisenia fetida). We recommend starting with about one pound of worms (approximately 1,000 individuals).
Step 2: Prepare the bedding. Tear up newspaper or cardboard into one-inch strips. Soak them in water and then wring them out until they feel like a damp sponge. Fill your bin about three inches deep with this material.
Step 3: Introduce the worms. Place your worms on top of the bedding. They will naturally burrow down to avoid the light. Give them a day to settle in before their first feeding.
Step 4: Feeding. Dig a small hole in the corner of the bedding, drop in your scraps, and cover them back up. Covering the food is one of the most important indoor composting tips to prevent fruit flies.
For a detailed walkthrough, refer to the How to Create and Maintain an Indoor Worm Composting Bin | US EPA.
Maintaining Balance and Troubleshooting Your System
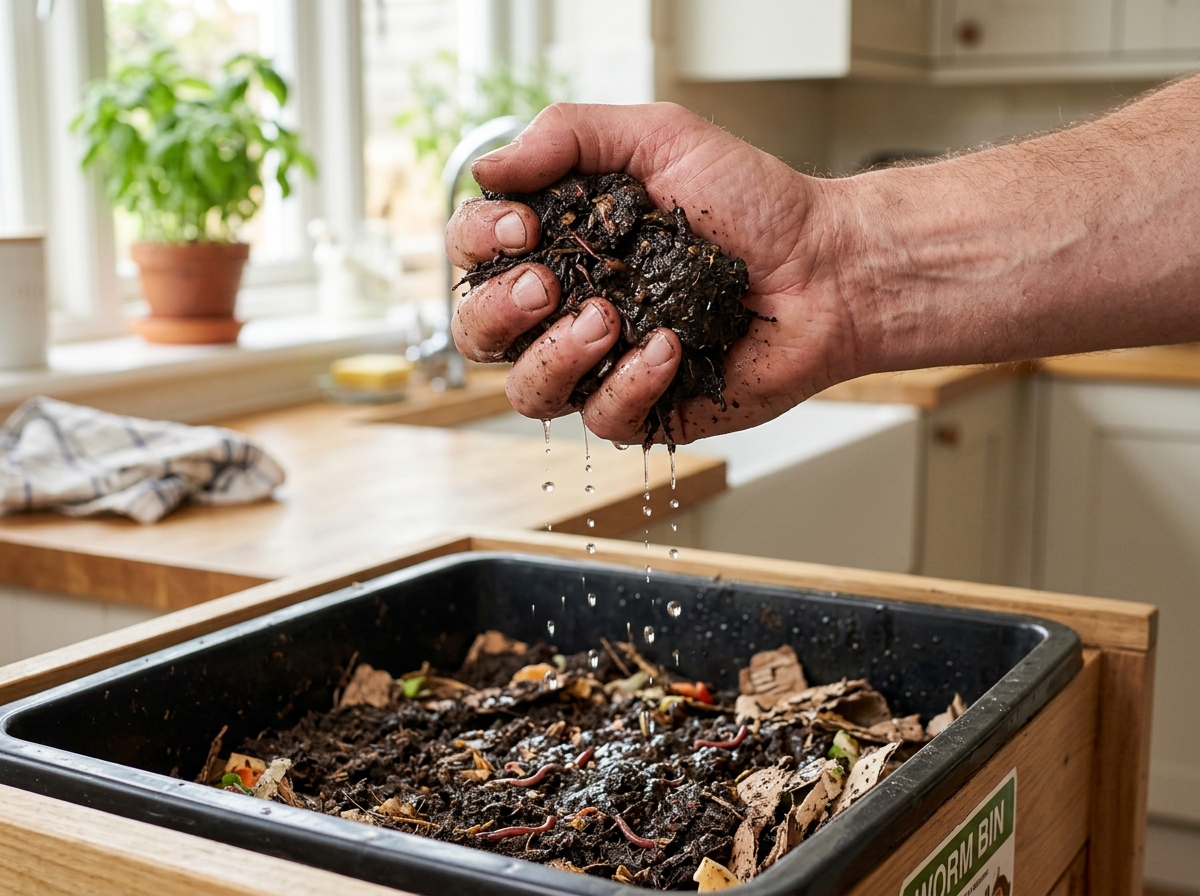
A healthy compost bin should smell like fresh rain or earthy woods. If it smells like anything else, the “portfolio” of your bin is out of balance.
Temperature and Moisture
Worms and microbes are like us—they have a “Goldilocks” zone. For worms, they thrive best in temperatures between 40°F and 80°F, with an ideal range of 55°F to 77°F.
Moisture is equally critical. Use the “Squeeze Test”: grab a handful of compost and squeeze. If more than a drop or two of water comes out, it’s too wet. If it doesn’t hold its shape, it’s too dry. Aim for a moisture level of 60–80%, similar to a wrung-out sponge. If you are also running a beginners-guide-to-microgreens-garden-setup, you’ll already be familiar with this delicate moisture balance!
Aeration and Turning
Unless you are using the Bokashi method, your compost needs to breathe. For aerobic bins, use a small hand rake or fork to turn the material once a week. This introduces oxygen and prevents “dead zones” where bad odors can start. In a worm bin, the worms do the “turning” for you as they tunnel, but it’s still good to gently fluff the bedding occasionally.
Troubleshooting Odors with Pro Indoor Composting Tips
If you notice a foul smell, don’t panic. It’s usually an easy fix.
- Rotten Egg Smell: This means your bin is too wet and has gone anaerobic. The Fix: Add more dry “browns” (shredded paper) and stir the pile to add air.
- Ammonia Smell: You have too many “greens.” The Fix: Mix in more carbon-rich materials like cardboard.
- Fruit Flies: These are the bane of the indoor composter. The Fix: Ensure all food scraps are buried at least two inches deep. You can also freeze your fruit scraps for 24 hours before adding them to the bin to kill any existing fly eggs. If you’re already starting-an-indoor-garden-a-beginners-guide, keeping pests away from your compost is essential to protecting your young plants.
Harvesting and Using Your “Black Gold” Asset
After about 3 to 6 months, your patience will pay off. You’ll notice the bedding has disappeared, replaced by dark, crumbly, earthy-smelling material. This is your “Black Gold.”
How to Harvest
For a worm bin, the easiest method is the “Migration Method.” Move all the finished compost to one side of the bin and put fresh bedding and food on the other side. Over the next week, the worms will migrate to the new food, leaving the finished castings behind for you to scoop out.
Using Your Compost
Worm castings are incredibly potent. You can:
- Mix it in: Add 1 part compost to 4 parts potting soil for your from-tiny-apartments-to-lush-gardens-indoor-gardening projects.
- Top Dress: Sprinkle a thin layer on top of your houseplant soil.
- Compost Tea: Soak a handful of compost in a gallon of water overnight. Use this liquid to water your plants for a massive nutrient boost. When using Bokashi tea, remember to dilute it heavily—typically one teaspoon per gallon of water.
Frequently Asked Questions about Indoor Composting
Can I compost meat and dairy products indoors?
Generally, no. In aerobic and worm bins, meat and dairy will rot and create terrible odors and attract pests. However, if you use the Bokashi method, the fermentation process can handle small amounts of meat and dairy.
How do I prevent fruit flies from invading my bin?
The best defense is a good offense. Always bury your scraps under a thick layer of “browns.” Some people even use a piece of damp newspaper or a burlap sack as a “lid” inside the bin to create an extra barrier.
What is the best temperature for indoor worms?
Worms are most productive between 55°F and 77°F. If your apartment gets very hot in the summer, move the bin to the floor or a closet where it stays cooler. If it gets too cold, they will slow down their eating.
Conclusion
At FinanceOrbitX, we believe that sustainability and smart “asset management” go hand-in-hand. Turning your kitchen waste into high-quality fertilizer is the ultimate ROI for any indoor gardener. Whether you choose a high-tech electric composter or a humble bin of red wigglers, you’re making a choice that benefits your plants, your home, and the planet.
If you find you have too much compost (a great problem to have!), consider donating it to a community garden or sharing it with neighbors. Ready to take your green thumb to the next level? Explore more of our indoor gardening guides to see how you can use your new “Black Gold” to grow everything from microgreens to lush indoor jungles. Happy composting!
