
When Your Microgreens Turn Fuzzy: What You Need to Know About Downy Mildew
Microgreens downy mildew cure is something every home grower eventually needs to know about — because this disease can wipe out an entire tray in just days.
Here’s a quick answer if you’re in a hurry:
Quick Microgreens Downy Mildew Cure Summary:
- Remove infected trays immediately to stop spores from spreading
- Spray with a potassium bicarbonate solution (1 tsp per 2 liters of water) every 5-7 days for active infections
- Add grapefruit seed extract (8 drops per gallon of water) as a follow-up treatment
- Boost airflow with a small fan and keep humidity between 40-60%
- Discard heavily infected trays — some crops cannot be saved
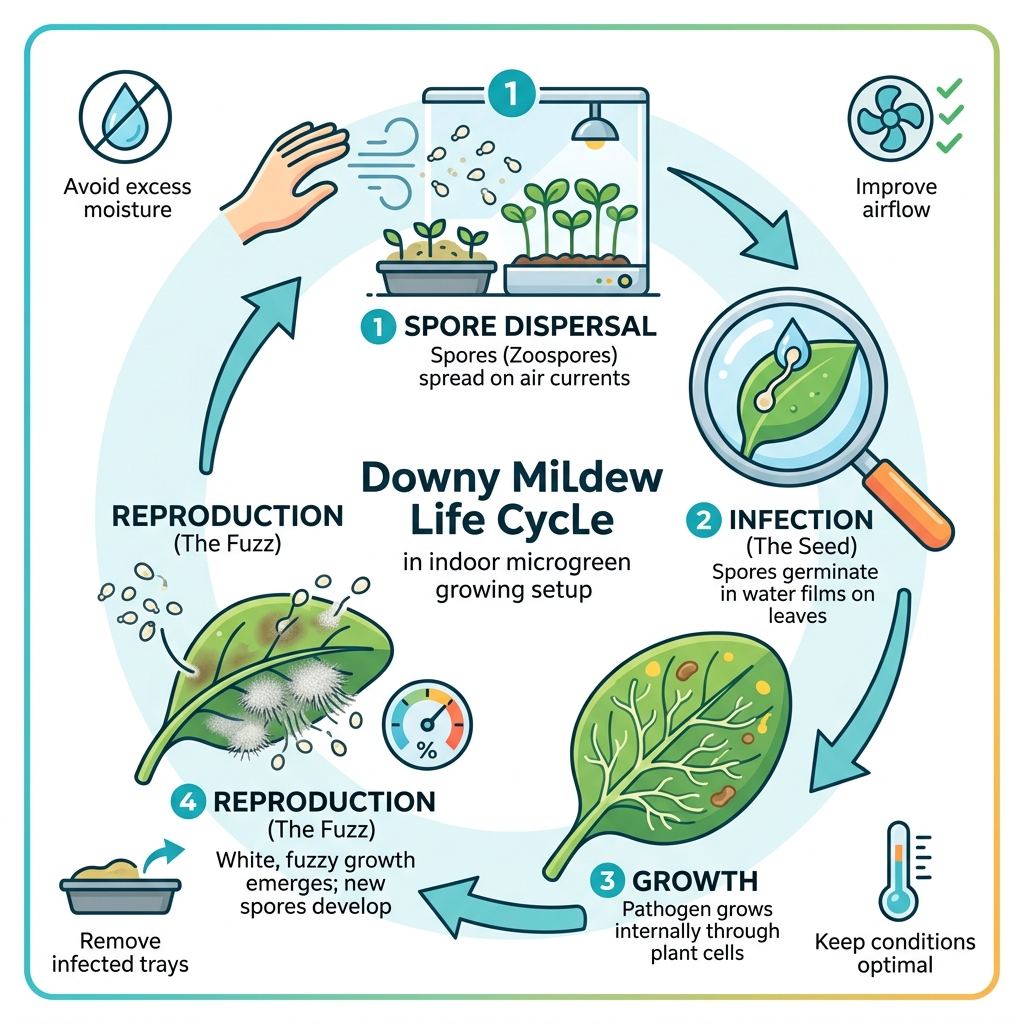
Downy mildew is not a true fungus. It’s caused by Peronospora parasitica, an oomycete — a water mold more closely related to algae than to fungi. That matters because some standard antifungal treatments simply won’t work against it.
It loves cool, damp, still air — exactly the conditions inside many beginner microgreen setups.
The bad news: it spreads fast. Spores travel on air currents and can move from tray to tray without warning.
The good news: it’s very preventable, and caught early enough, there are organic treatments that can help.
This guide walks you through how to identify it, treat it, and stop it from coming back.
Identifying the Culprit: Is it Downy Mildew or Just Root Hairs?
The first time we see white fuzz in our trays, our heart sinks. But before you panic and reach for a microgreens downy mildew cure, we need to make sure you aren’t actually looking at healthy root hairs.
Root hairs are a natural part of the plant. They are microscopic, tiny, and featherlike. They usually only appear on the root itself and disappear the moment they get wet. If you mist the area with water and the “fuzz” vanishes, congratulations! You’ve got healthy roots.
Downy mildew, however, is much more stubborn. It typically presents as yellow or pale spots on the upper side of the leaves, while the underside develops a tell-tale gray, purplish, or white fuzz. Unlike root hairs, this fuzz stays visible even after misting. If left unchecked, it can cause systemic stunting, where the entire tray looks “stuck” and refuses to grow.
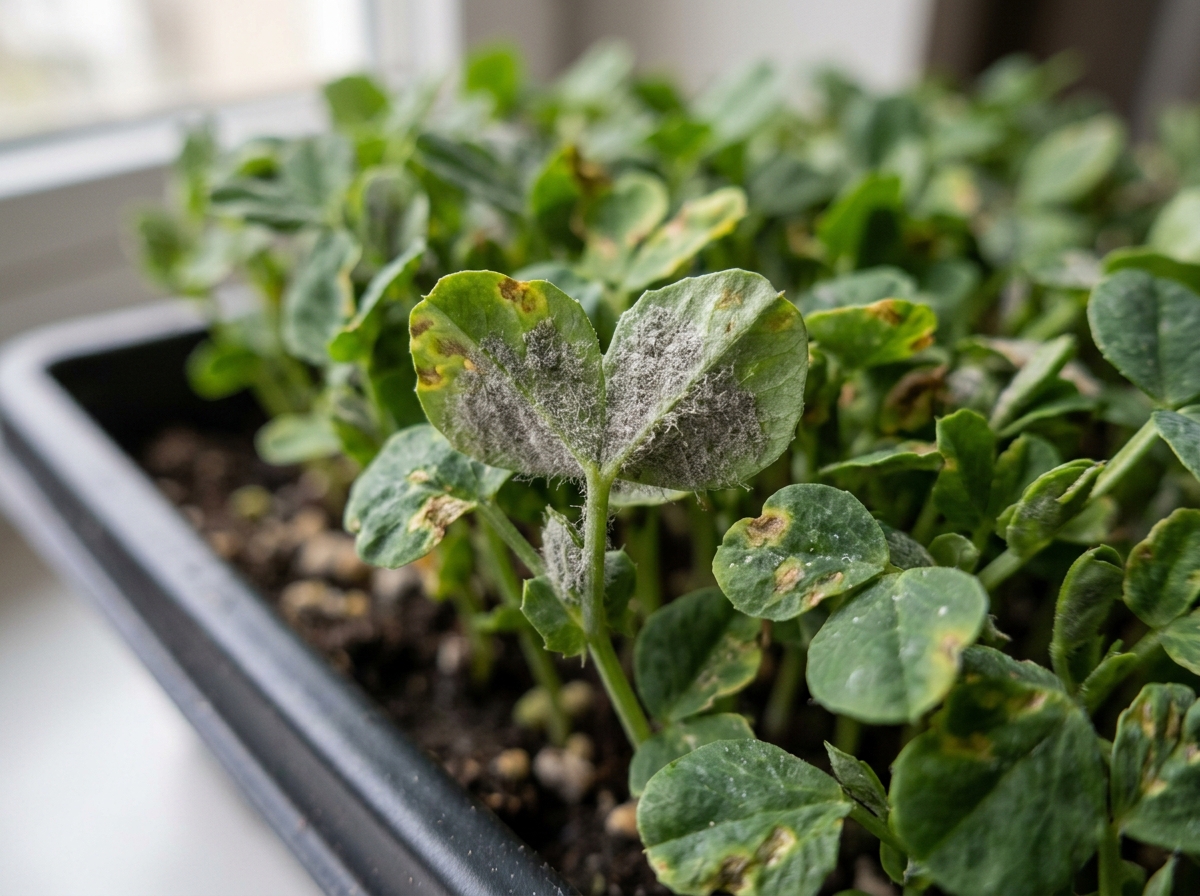
If you aren’t sure what you’re looking at, how-to-avoid-mold-in-your-microgreen-garden offers some great visual cues. To help you distinguish between the “good, the bad, and the ugly,” check out this comparison:
| Feature | Downy Mildew | Powdery Mildew | Root Hairs |
|---|---|---|---|
| Location | Underside of leaves | Top surface of leaves | Base of stem/roots |
| Appearance | Gray/purplish fuzz | White “flour” dusting | Thin, uniform white fibers |
| Reaction to Water | Stays visible | Stays visible | Disappears instantly |
| Odor | Musty or swampy | Earthy | No odor |
Susceptible Varieties to Watch
Not all greens are created equal when it comes to disease resistance. In our experience, the Brassica family is particularly vulnerable. If you are growing the following, keep a close eye on them:
- Radish and Kohlrabi: These grow fast but can succumb just as quickly.
- Broccoli and Basil: Basil loves warmth, so if things get too cool and wet, downy mildew moves in.
- Spinach and Peas: Large seeds like peas often hold more moisture, creating a playground for oomycetes.
Why Your Setup is Inviting Downy Mildew
At FinanceOrbitX, we believe in “investing” in your environment to prevent losses later. Downy mildew doesn’t just appear out of nowhere; it is invited in by specific environmental conditions.
The most common culprit is high humidity. Ideally, your growing space should stay between 40% and 60% humidity. When levels spike above 70%, the air becomes saturated, and moisture sits on the leaves. This is when spores germinate.
Air circulation is the second major factor. Stagnant air allows pockets of moisture to build up around the stems. Using tools-to-prevent-mold-in-microgreens like small clip-on fans can make a world of difference by keeping the air moving and the leaf surfaces dry.
Finally, watch your temperature control. Downy mildew is most often a problem in cool, wet weather, specifically when temperatures are below 75°F (24°C). For the germination phase, we recommend keeping your space between 65-75°F (18-24°C) to ensure the seeds pop quickly without giving pathogens a head start.
The Ultimate Microgreens Downy Mildew Cure and Treatment Guide
If you’ve spotted the signs, don’t throw in the towel just yet. While prevention is the best “medicine,” there are active steps we can take to treat the issue. A microgreens downy mildew cure often involves adjusting the pH of the leaf surface to make it inhospitable for the mold.
One of the most effective tools in our arsenal is potassium bicarbonate. This food-grade mineral raises the pH on the surface of the microgreens, effectively “burning” the mildew without harming the plant (or you!).
Another powerful organic option is grapefruit seed extract. Diluting just 8 drops per gallon of water creates a potent spray that can kill off mold spores on contact.
When applying these treatments, it is vital to avoid avoid-these-common-microgreen-growing-mistake like over-saturating the tray. You want a fine mist, not a soaking.
Organic Microgreens Downy Mildew Cure Sprays
For those who want a “heavy-duty” organic approach, you can mix a DIY pest and disease control spray. This recipe is safe for food crops because it uses ingredients you might already have in your kitchen or garden shed:
- 2 Liters of Water
- 1 tsp Food-Grade Potassium Bicarbonate (inhibits fungal growth)
- 1/4 tsp Organic Neem Oil (disrupts pests and fungi)
- 1/4 tsp Organic Oregano Oil (natural antifungal)
- 1/8 tsp Castile Soap (helps the mixture stick to the leaves)
Pro Tip: Always perform a patch test. Spray a small corner of your tray and wait 24-48 hours. If the plants look healthy, go ahead and treat the rest. Apply this in the early morning or late afternoon to avoid “leaf burn” from your grow lights.
When a Microgreens Downy Mildew Cure Isn’t Enough: Salvage vs. Disposal
We have to be honest: sometimes the best microgreens downy mildew cure is the trash can. If you notice a “swampy” or rotten odor, or if the tray has completely collapsed (a sign of damping off or advanced mildew), it’s time to let go.
Microgreens are eaten raw and very quickly. Because downy mildew can produce invisible spores that spread beyond the visible fuzz, consuming infected greens isn’t worth the risk. If you see a small patch of infection, you can try to remove the affected area plus a 1-inch “buffer zone” of healthy-looking soil, as suggested in how-to-avoid-mold-in-your-microgreen-garden-2. However, if the infection has spread to more than 20% of the tray, we recommend discarding the entire crop and starting fresh.
Prevention: Building a Fortress Against Infection
If you want to stop the cycle of infection, you need to change your strategy. Prevention starts the moment you pull your seeds out of the bag.
One of the most effective ways to keep leaves dry is the bottom watering technique. Instead of pouring water over the top of your delicate greens, place your growing tray (the one with holes) inside a solid “flood” tray. Add about half an inch of water to the bottom tray and let the soil wick it up. This keeps the foliage dry and the roots hydrated.
Seed sanitization is another critical step. Some seeds, like sunflowers or cilantro, are “dirty” and carry spores on their hulls. You can sanitize them by soaking them in store-bought white distilled vinegar for 15 minutes before planting. This simple step can prevent an outbreak before it even begins. For more troubleshooting, check out common-beginner-microgreens-troubleshooting-tips-for-new-gardeners.
Sanitizing Equipment and Trays
Your trays can harbor spores from previous grows for years if not cleaned properly. We recommend a two-step process:
- Clean: Wash away all organic matter and old soil with soap and water.
- Sanitize: Use a solution of one part 35% food-grade hydrogen peroxide to 11 parts water.
Spray your trays thoroughly and let them air dry completely before using them again. If you find that soil-based diseases are a recurring nightmare, consider switching to sterile grow mats made of bamboo or hemp fiber. These are inert and don’t provide the same “hiding spots” for pathogens that traditional soil does.
Frequently Asked Questions about Microgreen Diseases
Can I eat microgreens that have been treated for downy mildew?
If you have successfully treated a mild infection with organic methods like potassium bicarbonate or grapefruit seed extract, the greens are generally safe to eat after a thorough wash. However, if the mildew was extensive or the plants look slimy, we always recommend discarding them. Safety first!
How do I distinguish downy mildew from damping off?
Damping off is usually caused by soil-borne fungi like Pythium. It attacks the stem at the soil line, causing the seedling to “pinch” and fall over. Downy mildew is more of a leaf disease, starting with spots and fuzz on the foliage. Both thrive in wet conditions, but damping off is almost always fatal to the individual seedling.
Does light intensity affect the growth of downy mildew?
Yes! Microgreens should receive 6-10 hours of light daily. Strong, full-spectrum light helps the plants stay robust and can actually disrupt the life cycle of certain molds. While downy mildew isn’t “killed” by light alone, a weak, leggy plant in the dark is a much easier target for infection.
Conclusion
At FinanceOrbitX, we want your journey into indoor gardening to be as profitable and enjoyable as possible. Dealing with a disease outbreak can be frustrating, but finding the right microgreens downy mildew cure is just another skill in your gardening portfolio. By controlling your humidity, sanitizing your equipment, and acting fast when you see spots, you can ensure your “green investments” pay off in healthy, delicious harvests.
Ready to level up your growing game? More info about growing tips can help you master the art of the perfect tray!
