
Why Growing Micro Salad Is Worth Starting Today
Growing micro salad is one of the fastest, cheapest ways to add fresh, nutrient-rich greens to your diet — no garden required.
Here’s a quick answer if you’re short on time:
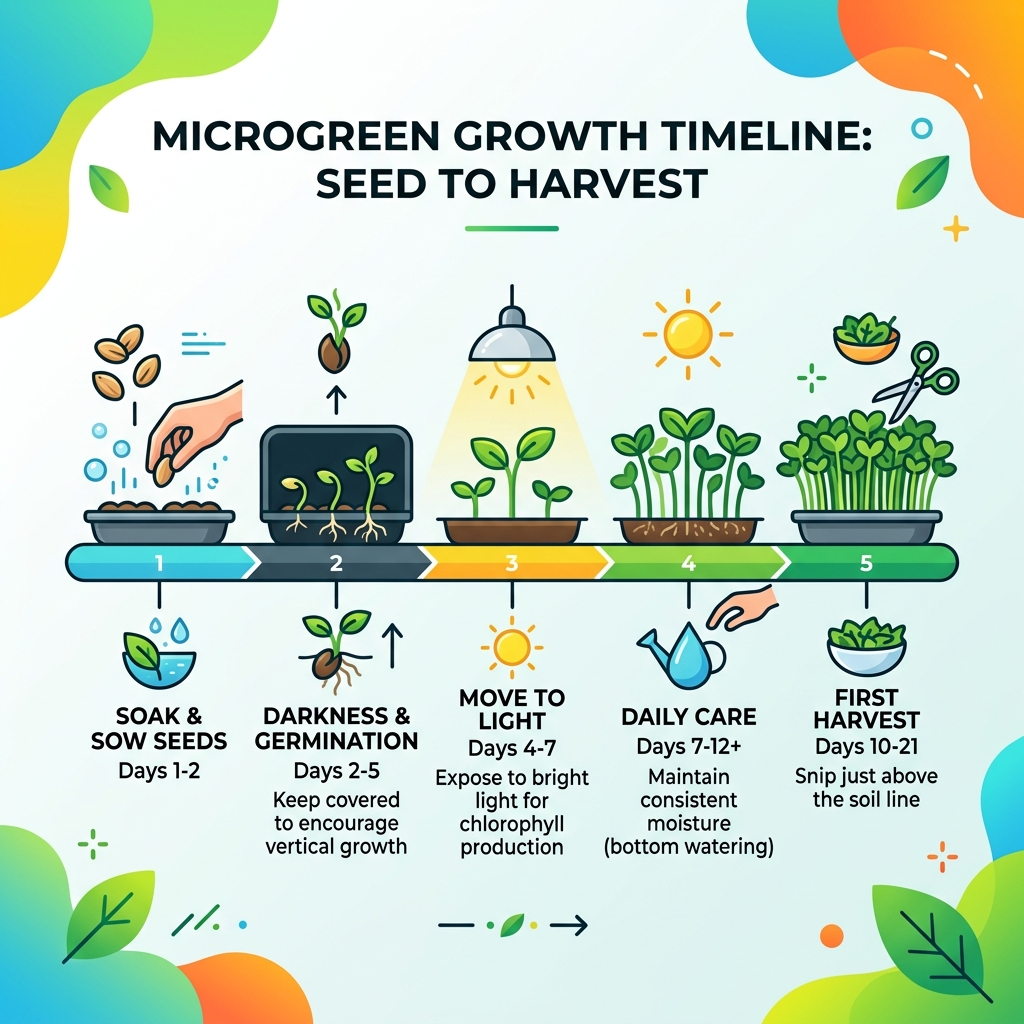
How to grow micro salad (at a glance):
- Fill a shallow tray (2-3 inches deep) with potting mix or coconut coir
- Sow seeds densely — about 10-15g per 12×20-inch tray
- Keep in the dark for 3-5 days to germinate
- Move to light — a sunny windowsill or grow light works well
- Water daily (from below to avoid mold)
- Harvest in 7-21 days, cutting just above the soil line
The numbers make a strong case for growing your own. A 3×3 foot space can produce 1.5kg (3.3 lbs) of microgreens in just six weeks — enough for 16 full salads. The cost? Around $0.92 per 100g at home, compared to $5-$10 per 100g at specialty stores. That’s up to 10 times cheaper.
And it only takes about 5 minutes a day to maintain.
Whether you want a steady supply of peppery radish shoots, sweet pea shoots, or nutty sunflower microgreens, the setup is simpler than most people expect. This guide walks through every method — from soil to hydroponics — so you can choose the approach that fits your space, budget, and goals.
Understanding Microgreens vs. Sprouts and Baby Greens
To master growing micro salad, we first need to define exactly what we are producing. While they all look like “tiny plants,” the differences in cultivation and safety are significant.

- Sprouts: These are the youngest stage. They are grown entirely in water (no soil or media) in dark, humid conditions. You eat the whole thing—seed, root, and stem. Because they love the same warm, wet environments as bacteria, they carry a higher risk of contamination.
- Microgreens: This is the “sweet spot” for home growers. We harvest them at the cotyledon stage (the first set of seed leaves) or just as the first “true leaves” appear. We grow them in a medium like soil or coconut coir, and we only eat the stems and leaves—never the roots. This air exposure makes them much safer than sprouts.
- Baby Greens: These are simply older microgreens. They are harvested after the plant has developed several sets of true leaves but before it reaches full maturity. While delicious, they take longer to grow and require more space and nutrients.
For a deeper dive into these distinctions, check out our microgreens 101 a beginners guide.
The Economics and Benefits of Growing Micro Salad at Home
At FinanceOrbitX, we love a good Return on Investment (ROI), and growing micro salad offers one of the best “nutritional ROIs” in horticulture.
Consider this: a small 3.5oz tub of microgreens at a high-end grocery store can easily set you back $5.00 to $10.00. When we grow them at home, our costs plummet. Based on our research, you can harvest 1.5kg (3.3 lbs) of greens from just six mushroom trays in a tiny 3×3 foot space over six weeks.
| Factor | Home-Grown (FinanceOrbitX Method) | Retail/Specialty Store |
|---|---|---|
| Cost per 100g | ~$0.92 (£0.66) | $5.00 – $10.00 (£4.00 – £8.00) |
| Freshness | Harvested minutes before eating | Days or weeks old |
| Variety | Unlimited (custom mixes) | Limited to what’s in stock |
| Space Needed | 3×3 foot windowsill/shelf | N/A |
Beyond the financial savings, the health benefits are staggering. Research indicates that microgreens can have vitamin concentrations up to 40 times higher than their mature counterparts. By dedicating just 5 minutes a day to watering and harvesting, you are essentially printing your own superfood.
To get your financial and physical health in sync, see our beginners guide to microgreens garden setup 2 and explore the debate of soil vs hydroponics which is best for microgreens.
Essential Supplies and Seed Selection for Success
You don’t need a greenhouse to be successful. In fact, we often use recycled materials to keep costs even lower.
The Hardware
- Growing Trays: The industry standard is the “1020 tray” (10 inches by 20 inches), but you can use recycled mushroom punnets, strawberry containers, or even pie plates. Just ensure they have drainage holes!
- Growing Medium: We recommend a high-quality, peat-free potting mix or coconut coir. Some growers prefer hydroponic mats (jute or hemp), but soil often produces the most flavorful results.
- Light Source: A south-facing windowsill is great, but for consistent “at scale” growth, a simple LED grow light on a timer is a game-changer.
- A Spray Bottle: Essential for the early days of germination.
The Seeds
When growing micro salad, always buy seeds labeled for sprouting or microgreens. Avoid “treated” garden seeds, which may contain fungicides.
- The Brassica Family: Broccoli, kale, radish, and kohlrabi are the “bread and butter” of microgreens. They are fast, reliable, and packed with sulforaphane (especially broccoli).
- Pea Shoots: Use dried marrowfat peas from the grocery store for a budget-friendly, crunchy base. Check out how to grow pea shoots here.
- Sunflower Seeds: These provide a nutty, substantial “bulk” to salads. Use black oil sunflower seeds for the best results.
For more clever ways to save, read our smart hacks for the microgreen gardener.
Step-by-Step Guide to Growing Micro Salad
Ready to get your hands dirty? Follow our proven process for a successful harvest.
- Prepare the Medium: Fill your tray with 1-2 inches of soil or moistened coconut coir. Press it down gently to create a flat, even surface. We don’t want “hills and valleys” where water can pool.
- Sow the Seeds: This is where beginners often hesitate. You want to sow thickly. For a standard 1020 tray, use about 10-15g of small seeds (like broccoli) or up to 150g for large seeds (like peas). Aim for 10-12 small seeds per square inch.
- The “Weighted” Secret: After sowing, mist the seeds generously. Then, place an empty tray directly on top of the seeds and add a 2-5 lb weight (like a brick or a heavy book). This forces the roots to grow deep into the soil and helps the seedlings shed their seed hulls.
- Blackout Phase: Keep the trays covered and in the dark for 3-5 days. Check daily and mist if the soil feels dry.
- The Reveal: Once the seedlings are about an inch tall and looking a bit pale (yellowish), remove the weight and the cover.
- Light and Water: Move them to your light source. They will turn a vibrant green within hours! Switch from misting to bottom watering—pour water into a bottom tray so the roots soak it up without getting the leaves wet.
For a first-timer’s perspective, see our microgreens planting guide for the first time gardener.
Optimizing Conditions for Growing Micro Salad
To grow at scale, consistency is key. We recommend keeping your grow room (or kitchen corner) between 60-75°F. If you use lights, set a timer for 18 hours on and 6 hours off.
Airflow is your best friend. A small, gentle fan prevents stagnant air, which is the primary cause of mold and “damping-off” (a disease where stems rot at the soil line). If you’re interested in soilless methods, our your guide to soil free microgreens growing 2 has you covered.
Succession Planting for a Continuous Growing Micro Salad Supply
The biggest mistake new growers make is planting everything at once, then having way too much salad for one week and none for the next three.
We use a rotational system. By planting two small trays every 4 days, you ensure a perpetual harvest. A 4-tray cycle is usually perfect for a two-person household. This way, as you harvest one tray, the next is moving under the lights, and a third is just beginning its blackout phase.
Learn how to master this rhythm in our ultimate guide to growing microgreens at home.
Harvesting, Storage, and Culinary Inspiration
The moment of truth! Most microgreens are ready when they are 2-3 inches tall, typically 7-14 days after planting (though some, like cilantro, can take 21 days).
The Harvest
Use sharp, clean scissors or an electric knife. Grasp a clump of greens and snip just above the soil line. Try to avoid getting any soil or “perlite” on the greens, as washing them can reduce their shelf life.
Storage
Microgreens are delicate. For maximum longevity:
- Harvest when the plants are dry (don’t water right before cutting).
- Place them in a glass container or a plastic bag with a dry paper towel to absorb excess moisture.
- Store at 41°F in the refrigerator.
- They should stay fresh for 5-10 days, though they are best eaten immediately!
Culinary Inspiration
Don’t just use them as a garnish!
- The Main Event: Use pea shoots and sunflower greens as a base for a full salad.
- The Flavor Kick: Add radish or mustard microgreens to sandwiches and tacos for a spicy punch.
- The “Confetti”: Sprinkle over soups, omelets, or avocado toast.
- The Blend: If you have a surplus, blend them into smoothies or pesto.
For more harvesting tips, visit proper techniques for harvesting microgreens or browse our growing tips category.
Frequently Asked Questions about Growing Micro Salad
Are there any safety concerns or common problems like mold?
The most common issue is white fuzzy mold. This is usually caused by overwatering or poor airflow. Don’t confuse mold with root hairs, which are tiny, white, fuzzy structures that grow out of the roots—these are perfectly healthy! If you do see actual mold on the soil, increase your fan speed and switch to bottom watering only.
Do microgreens regrow after the first harvest?
Most microgreens are a “one and done” crop. Once you cut the stem below the leaves, the plant cannot photosynthesize and will die. However, pea shoots are a notable exception. If you cut them just above the lowest leaf node, they will often send out a second (and sometimes third) shoot!
What are the best seeds for a first-time grower?
If you want a “win” right out of the gate, go with Radish. They germinate in 24 hours and can be ready to eat in as little as 6 days. They are hardy, colorful, and taste exactly like a spicy radish bulb.
Conclusion
At FinanceOrbitX, we believe that taking control of your food supply is a vital step toward both physical and financial wellness. Growing micro salad isn’t just a hobby; it’s a sustainable lifestyle choice that pays dividends in flavor and nutrition every single day.
By following these techniques, you can turn a small corner of your home into a high-yield “salad factory.” Whether you’re looking to save money, eat cleaner, or just enjoy the magic of watching things grow, there’s no better time to start than today.
